This post was written 6/20/12 but somehow I forgot to attach the last picture and hit post! Here it is, belated:
The first major task we took over for our yard, besides the never-ending weeding, was to work on our edibles. Every year, we like to go to the Tilth Edible Plant sale in May. Their plant starts are largely nursery grown, which mean our "babies" have needed tender attention. We put them in the garage at night and carried them out each morning for their yard time. Meanwhile, we turned our attention to building them a home.
Sometime back in April, my sister came to help us out in the yard (her smaller yard having been exhausted of weeds) and when the rain and wind kicked up, she obliged by driving us to Lowe's to buy the wood for our vegetable bed. It's a lot easier to transport eight foot long lumber in an SUV than wedging it in a Mazda 6 or Protege. The lumber sat in our garage for too long, but finally near the end of May, we started building. We followed these instructions when constructing our bed(s), except I wanted to make the long boards overlap at the end for a square corner. We skipped putting any sort of hardware cloth in the bottom.
We decided the best spot for our vegetable beds was on the south side of the house where they would get full sun. I wanted to put them in the yard space between the fence and the driveway so that in the future when we get a dog, we can let it run around the yard and have no fear of it nosing into the food. We planned for only one bed but figured there was space to expand in future years for one or two more. We spaced the bed about 40" from the fence as we think in future years, we'll dig up along the fence and use it as a support for growing peas.
I went to task of digging up the lawn for the area under the bed. Wow, I never knew that was such hard labor! I dug up a 4 x 4 foot square patch and was exhausted and had to stop for the day. I turned the sod pieces upside down with the grass down and put them in a pile until I had time and energy another day to loosen and regain as much of the soil as possible. (I had read that you want to stack sod upside down or the grass will just start growing and glue your pile together.)
 |
| Initial 4x4 foot area dug up for the bed's base. |
We finished digging up the lawn and then used the reclaimed dirt from the sod chunks and a bag of topsoil we had to make it as level as possible. I thought we were supposed to line the bed with black plastic to help make it last longer as it would keep the soil and its organisms more separated from the wood. After lining half of it, Jeff thought we shouldn't line it as he didn't really find any references online to doing that. (I think I got the idea from this picture.) So we decided to do a non-scientific test and leave it half and half.
Unfortunately, I ended up with a horrible headache the day we were starting to load the new bed with dirt. When I was finally able to crawl out of our bed, J demonstrated the technique he had invented to more easily spread the dirt from the (shiney new) wheelbarrow into the bed. He used the rake and wedged it under the lip of the wheelbarrow to tilt it at an angle.
 |
| Left: HUGE pile of soil from Cedar Grove; Right: J showing me how he wedges the rake under the wheelbarrow to make it easier on the back. |
The vegetable bed looked so great...and the pile of soil was barely dinted. We scratched our heads until we realized we had calculated how much we needed based on 3 feet height (I think I dreamed up that number based on the fact that they were three boards high, even though they were only 1x6) instead of 17". That meant we ordered a little more than double. J drove to the store and bought some more lumber and quickly made a second bed. This time, we decided NOT to dig up the lawn under it, so we'll see what, if any, difference that makes.
The second bed looks better than the first, partly because J knew what we were doing this time. However, the other reason is because it didn't get moved about constantly. Learn from us, only move your bed once or twice if you can help me. We were constantly moving the first one up on end and back down as we tested things, made measurements, prepared the ground, etc. Sitting in the rain and with all that movement, half the boards somehow wiggled loose despite being screwed instead of nailed.
Something we forgot when it comes to buying most vegetables - usually there are more than one plant to the pot. In the past, we've only bought tomatoes and two peppers. They only have one plant to the pot. We ended up needing that second vegetable bed since there were six brussel sprout plants in the one container, six chard, six cucumber (and we bought two)! It turned out to be serendipitious that I miscalculated our soil needs. We were able to give all our vegetables homes and still have enough left over for our herb spiral, which is our next major yard project.
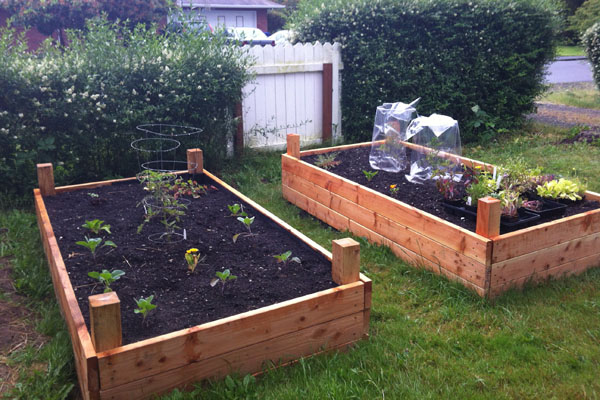 |
| Ta-Da! The vegetables all tucked in their new beds. |
No comments:
Post a Comment