
Feeling so inspired, I decided to finally try my hand at making homemade marshmallows!
CORN-FREE MARSHMALLOW RECIPE
courtesy of Maria, mother of one of my childhood friends

- 2 Tbl Knox Gelatin (2+ packets - next time I'll try two packets instead of by measurement)
- 3/4 C cold water
- 2 C sugar
- 1/8 tsp salt
- 3/4+ C boiling water
- 1 Tbl Vanilla
- powdered sugar, granulated sugar, or coconut for dusting
MATERIALS
- 8x8 Pyrex dish, or any other similarly sized dish or container
- Pam or other vegetable oil spray
- 2 Quart heavy saucepan
- 1 medium heat-safe bowl (glass or metal)
- Mixer
- Pastry brush and wooden spoon
- Candy thermometer or small bowl/cup and metal spoon
- Spatula
Before we start, just a brief safety warning that you will be working with melted sugar. Be VERY careful not to splash any on your skin as it will not only burn, but the sugar will stick to the skin making the burn worse.
- Lightly coat the Pyrex dish and the spatula with cooking spray (I use Trader Joe's canola oil spray). Coat the dish with your choice of powdered sugar, granulated sugar, coconut, etc.

- Pour the 3/4 cup cold water in the bowl and sprinkle gelatin on top. Let soften for about 5 minutes.

- Bring the other 3/4 cup water in the saucepan. Put the bowl on top (to create a double-boiler effect) to warm up and dissolve the gelatin in the bowl as you bring the water in the pan to a boil. Since some of the water will boil off, I put in a little over 3/4 cup of water into the saucepan so that I would be left with 3/4 cup by the time the gelatin was dissolved. Place the bowl of dissolved gelatin to the side.


- Clip the candy thermometer to the edge of the pan, making sure the bulb is not touching the bottom. Add in the 2 cups sugar and 1/8 tsp salt. Stir until the sugar is dissolved, and cook until the soft crack stage (280 degrees F).

- If you don't have a candy thermometer, you can do the water check method. You want to have a small bowl or cup with cold water (not ice) and a metal spoon. When you drip some of the sugar mixture into the water, you should be able to gather up the blog with your fingers. Soft crack stage will be when the sugar is pliable and you can pull it into kind of taffy strands. Or if you're like me, you try this step in addition to the thermometer because it's fun and cool to do! Want more information? This site has fun video of the various cooked sugar stages.
- I kept stirring the sugar occasionally after it dissolved, which I guess is kind of a no-no, but it didn't cause any problems for me.
- If any sugar crystals form on the edge of the saucepan, you want to brush them off with the pasty brush frequently. I forgot about this so I just ignored them and was careful not to knock them into the bubbling sugar. Why? The small crystals can cause your mixture to become grainy.
- It will take quite a while for the sugar to reach the final temperature. For a while, it will seem like it's not getting any hotter, but be patient. Once you reach the soft ball stage, stay near the stove as it will make the remaining heat climb quite quickly.
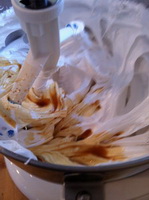
- Pour the melted sugar and gelatin mixture into a mixing bowl and beat on low speed for 3 minutes. I'm not sure why, but my guess is so that it all cools down without splashing.
- Continue beating at medium speed for 10 minutes or until the mixture is fluffy and creamy.

- Add in 1 Tbl vanilla and beat on low just until combined.
- Working quickly, pour into your prepared dish, using the oiled spatula to smooth and spread the marshmallow. Dust the top with your chosen coating and allow to cool for at least half an hour until set.

- Cut as desired. I turned mine out onto a cutting board and played with a star and a heart cookie cutter. The easiest way to cut into squares is with a pizza cutter. If it sticks, try dipping it into some hot water.


- If desired, coat the cut marshmallows with your sugar/coconut so that the cut edges aren't sticky. Marshmallows should keep in an airtight container for up to 2 weeks...if they last that long!


That looks like a really great idea. Everitt would love it and we could make big dinosaur-shaped marshmallows.
ReplyDeletethey never last that long though *giggle* we have made our own marshmellows for years, lately playing with food-colouring as well.. but I still can't get the same kind of coating that you get one the store-bought ones.. oh well.. mine taste better at least ;)
ReplyDelete